Ok, so a few people have been asking me how I did the shadow shading in Carnage. I promised to write a kind of tutorial, so here it is.

This isn't a particularly attractive shader and there are many better examples on the forum. The purpose of this is just to help you understand how it all works.
Firstly, thanks to Evolved for all his work which is where I leant all the basics from. But having said that, his shaders are really complicated because they're packed full of cool normal mapping and the like. When I finally tore them apart, I was surprised to see just how simple the actual shadow shading bit is. It really doesn't take many lines at all.
So without further ado, here's a brief explanation of how to write a very basic shadow shader.
BASIC STEPS
The basic steps in getting a shadow onto any scene are these ...
1. Make some objects and set them to use your shadow shading FX/DBS file
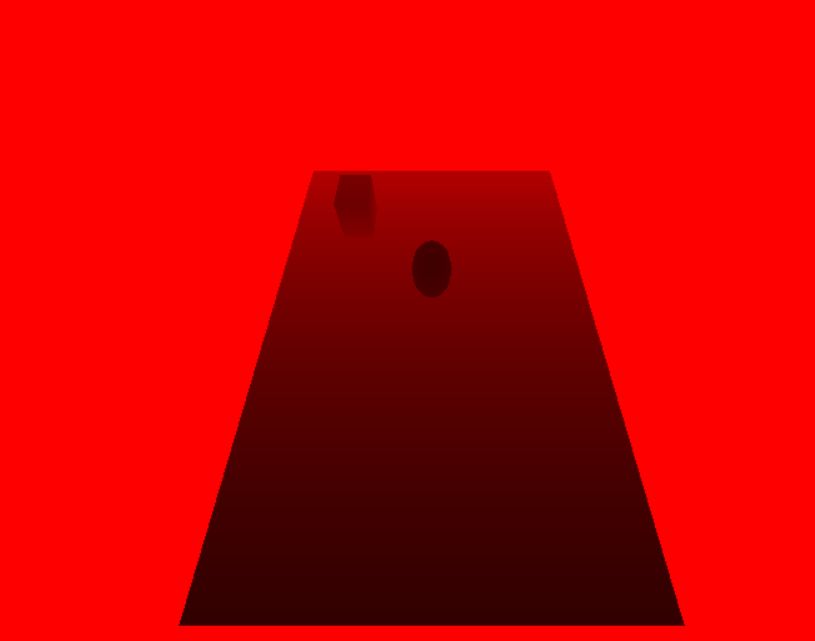
2. Make an additional camera which renders the world from the light's perspective to a 'depth texture'. So imagine you are the light bulb and you're looking at the scene. Save that view to an image, with a kind of depth based colour effect.
3. Texture all your shaded objects with this depth texture at stage 1. Stage 0 has their normal texture, but stage 1 has this depth texture applied, so they know how the light views the world.
4. Render the normal camera, taking into account how the light views the world to figure out where the shadows are.
DBP Source Code
`Object IDs
global dbObjFloor = 1
global dbObjSphere = 2
global dbObjCube = 3
global dbObjLight = 4

`Texture IDs
global dbImgObjectTexture = 1
global dbImgLightObjectTexture = 2
global dbImgDepthTexture = 3

global depthTextureResolution = 1024

`Unimportant initialisation stuff.
Init()

`Load shader
load effect "SimpleShadow.dbs",1,0,1

`Make objects and apply texture
make object plain dbObjFloor,20,20: texture object dbObjFloor,dbImgObjectTexture: xrotate object dbObjFloor,270
make object sphere dbObjSphere,2: texture object dbObjSphere,dbImgObjectTexture
make object cube dbObjCube,2: texture object dbObjCube,dbImgObjectTexture
make object sphere dbObjLight,1: texture object dbObjLight,dbImgLightObjectTexture

`Apply shader to our objects
set object effect dbObjFloor,1
set object effect dbObjSphere,1
set object effect dbObjCube,1

`Make a camera that will render our depth texture
`Set the range as precisely as possible so our depth has lots of granularity
make camera 1: set camera range 1,1,20: set camera fov 1,130: color backdrop 1,rgb(255,0,0)

`Make our depth texture image and make our new camera render to this texture
create bitmap 1,depthTextureResolution,depthTextureResolution
get image dbImgDepthTexture,0,0,depthTextureResolution-1,depthTextureResolution-1
set camera to image 1,dbImgDepthTexture,depthTextureResolution,depthTextureResolution
delete bitmap 1

`Apply this image as the depth texture on all our objects
texture object dbObjFloor,1,dbImgDepthTexture
texture object dbObjSphere,1,dbImgDepthTexture
texture object dbObjCube,1,dbImgDepthTexture


set current bitmap 0


`Make some matrices which we'll use for storing the lights view
result = make matrix4(1)
result = make matrix4(2)
result = make matrix4(3)


do
   `************* STEP 1 *************
   `Move objects around, perform all game logic and generally do yo' thang (not much thang going on here)
   position object dbObjSphere,0,6+sin(timer()/10.0)*4,0
   position object dbObjCube,sin(timer()/15.0)*10,2+sin(timer()/20.0),5


   `************* STEP 2 *************
   `Position our shadow light source and calculate a projection matrix for it. This matrix describes
   `how our light views the world
   position object dbObjLight,0,12,sin(timer()/10.0)*10 `Position our dummy light object
   position camera 1,object position x(dbObjLight),object position y(dbObjLight),object position z(dbObjLight)
   point camera 1,0,0,0 `Our light camera needs to render the world, so look at the world
   `Now make our matrix
   set current camera 1
   view matrix4 1
   projection matrix4 2
   multiply matrix4 3,1,2 `This matrix describes how our light views the world

   `************* STEP 3 **************
   `Now we need to render the world from the perspective of the light. Rather than rendering it as
   `normal, we will set the Depth technique in our shader, which will cause it to render in red scale
   set effect technique 1,"GetDepth"
   set effect constant matrix 1,"LightProjMatrix",3 `Pass in our lights view of the world
   set effect constant float 1,"ShadowAdjust",0.01 `Pass in a value which reduces self shadowing problems
   sync mask 2: fastsync `Tell DB we only want to render our light camera
   set current camera 0 `Return to our normal camera

   `You can hold down Return here to see what the depth texture looks like
   if returnkey() then paste image dbImgDepthTexture,0,0

   `************ STEP 4 ***************
   `Now we have our depth texture, the last step is to render the world as normal.
   set effect technique 1,"NormalRender" `Change our shader back to the normal technique
   `Position our camera
   position camera 0,0,0
   xrotate camera 45
   yrotate camera wrapvalue(camera angle y()+0.1)
   move camera -30
   `Render
   sync mask 1:sync
loop


`Unimportant initialisation stuff
function Init()
   set display mode 1024,768,32
   autocam off
   sync on
   sync rate 60

   `Make a texture for our objects
   create bitmap 1,512,512
   for x = 0 to 511
      for y = 0 to 511
         dot x,y,rgb(x/2,y/2,(x+y)/2);
      next y
   next x
   get image dbImgObjectTexture,0,0,511,511,0

   `Make a texture for the light object
   for x = 0 to 511
      for y = 0 to 511
         dot x,y,rgb(255,255,0);
      next y
   next x
   get image dbImgLightObjectTexture,0,0,511,511,0

   delete bitmap 1

   set current bitmap 0
endfunction
So that's the basic concept. If you open up the attached project, you should be able to run through the source code and see how it's done in DBP. I'll highlight the main bits here, with an explanation.
Lines 27-29. Any object that is going to cast a shadow or have a shadow cast upon it needs to have the shader applied.
Line 33. Make a camera which will render from the perspective of the light and make the depth texture.
- Set the range so that the maximum distance is the furthest away object we'll see. This ensure we get the maximum contrast in our depth texture.
- Set the FOV to whatever you want. The more you capture the more of your area will be shadows, but at the expense of shadow resolution.
- Colour the backdrop to red so that it blends correctly with the depth data generated.
Line 36-39: Make our depth texture image. Camera 1 will render to this image so will never render to screen.
Line 42-44: Set the texture stage 1 to our newly created depth texture. Now all our shaded objects will always have the latest depth texture from the lights perspective applied to them for analysis.
In the main loop ...
STEP 1
Perform all your logic which positions your objects first. One this is complete ...
STEP 2
Where ever you want the imaginary shadow shading light source to be, positing camera 1 here. Then look at the scene that you want to be in shadow. Once this camera is in position and looking the right way, we can calculate a projection matrix for the shadow light. This basically describes how the light views our objects.
STEP 3
The next step is to render what the light sees in a red shaded pattern. We do this by setting the effect technique of the shader to the "GetDepth" technique. We give the shader the light matrix we just calculated and then tell DBP to render the light camera.
The result of all this is an image which is a view from the light source, shaded in red with BLACK pixels being really close to the light, and RED pixels being really far away from the light.
 STEP 4
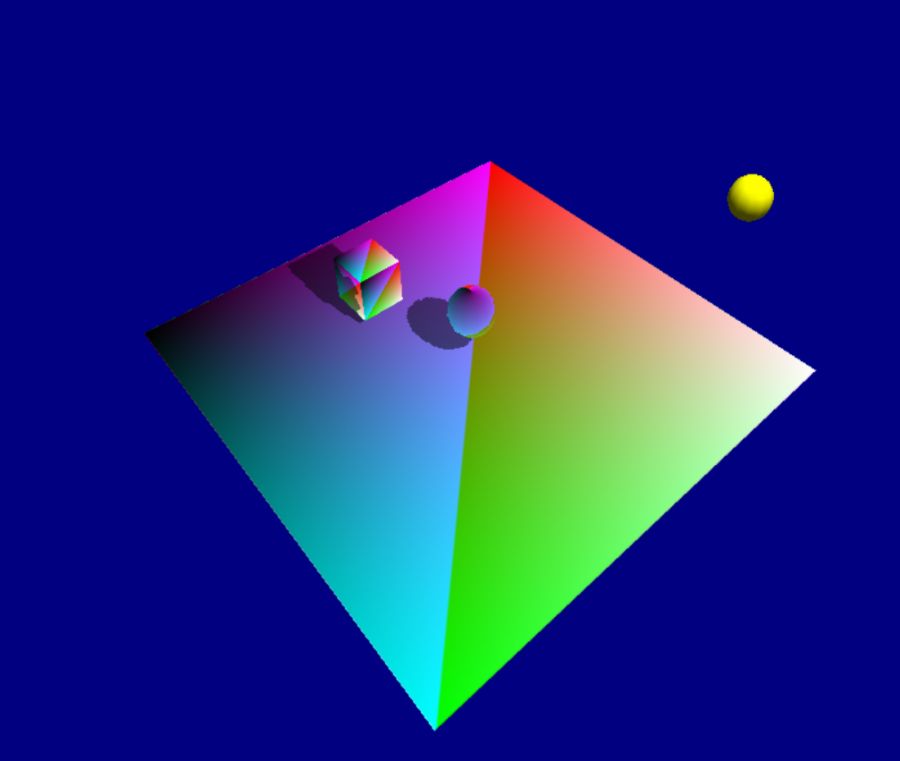
Now we want to render our final image ... the image the player sees. We set the shader effect back to the normal render and we sync camera 0.
Hey presto, our scene is rendered!
 The DBS Shader File
//------------------------------------------------
// Basic Shadow Shader, by Simon Keating (Fallout)
//------------------------------------------------
// A very basic shadow shader for you to build upon


// *********************************************************************************
// These are variable DBP passes into the shader for you. You add what you want here
// and they are automatically populated
// *********************************************************************************
matrix WorldVP : WorldViewProjection;  // This matrix describes how the camera sees the object we're shading
matrix World : World;                  // This matrix describes how an object is translated in the world
matrix ViewMat={0.5,0,0,0.5,0,-0.5,0,0.5,0,0,0.5,0.5,0,0,0,1};


// ******************************************************************************
// These variables are ones we can pass in using the SET EFFECT CONSTANT commands
// ******************************************************************************
matrix LightProjMatrix; // This matrix describes how the light sees the object we're shading
float ShadowAdjust;     // The variable helps sort out some self shading issues


// *********************************************************************************************
// This is where we define what textures are mapped to our object and how we'll sample from them
// *********************************************************************************************
texture Texture1 <string Name="";>;	 // This says we'll expect a texture at LAYER 0. Our BASE texture!
sampler2D BaseTexure = sampler_state {  // This creates a sampler which will read from this texture
	Texture = <Texture1>;
};

texture Texture2 <string Name="";>;	 // This says we'll expect a texture at LAYER 1. The DEPTH texture.
sampler2D DepthTexture = sampler_state {  // This creates a sampler which will read from this texture
	Texture = <Texture2>;
};


// ******************************************************************************
// These are structures which define what goes in and out of our shader functions
// ******************************************************************************
// This data structure goes into our VERTEX SHADER when we're rendering depth
struct IN_DepthRender
{
	float4 VertexPosition : POSITION;
};

// This structure comes out of our depth VERTEX SHADER and goes into our depth PIXEL SHADER
struct OUT_DepthRender
{
	float4 VertexPosition : POSITION;
	float  DistanceFromLight : TEXCOORD0;
};

// This data structure goes into our VERTEX SHADER when we're rendering normally
struct IN_NormalRender
{
	float4 VertexPosition : POSITION;
	float2 VertexUVCoords : TEXCOORD0;
};

// This structure comes out of our normal VERTEX SHADER and goes into our normal PIXEL SHADER
struct OUT_NormalRender
{
	float4 VertexPosition : POSITION;
	float2 VertexUVCoords : TEXCOORD0;
   float4 LightVertexPosition : TEXCOORD1;
};


//******************************************************************************
// This is our vertex and pixel shader code. This is where all the magic happens
//******************************************************************************

// ---------DEPTH-----------

OUT_DepthRender VS_Depth(IN_DepthRender IN)
{
	OUT_DepthRender OUT;
	float4 WorldVertexPosition = mul(IN.VertexPosition,World);                        // Work out how the object vertex is positioned in the world
	float4 LightProjectionVertexPosition = mul(WorldVertexPosition,LightProjMatrix);  // Work out how the light sees this vertex
	OUT.VertexPosition = LightProjectionVertexPosition;                               // Save how our light views this vertex to our output
	OUT.DistanceFromLight = LightProjectionVertexPosition.z;                          // Save the depth of this vertex position to our output

	return OUT;
}

float4 PS_Depth(OUT_DepthRender IN) : COLOR
{
   // The pixel shader takes values from our vertex shader.
   // Calculate a red colour from our vertex depth. This is what you see on screen
   return float4(smoothstep(0,30,IN.DistanceFromLight+0.2),0,0,1);
}


// ---------NORMAL RENDER-----------
OUT_NormalRender VS_Normal(IN_NormalRender IN)
{
   OUT_NormalRender OUT;

	OUT.VertexPosition = mul(IN.VertexPosition, WorldVP);	                   // Work out how the normal camera views our vertex
	float4 WorldVertexPosition = mul(IN.VertexPosition, World);              // Work out how the vertex is positioned in the world
	float4 LightVertexPosition = mul(WorldVertexPosition, LightProjMatrix);  // Work out how the light sees this vertex
	OUT.LightVertexPosition = mul(ViewMat, LightVertexPosition);             // Modulate with view matrix and save to output

	OUT.VertexUVCoords = IN.VertexUVCoords;                                  // The pixel shader will also need the UV coordinates!

	return OUT;
}

float4 PS_Normal(OUT_NormalRender IN) : COLOR
{
   // The pixel shader takes values from our vertex shader.

   // The smoothstep function helps us get a nice smooth value when calculate how far this pixel is away from the light source
   float DistanceFromLight = smoothstep(0,30,IN.LightVertexPosition.z);

   float Darkness = 1;
   // The tex2Dproj function is the key function. It converts the position of the pixel in terms of how the light sees it
   // into a UV coordinate on the depth texture (rendered earlier). We can then compare the Z component (depth) of that texture
   // coordinate to the distance of our pixel from the normal camera. If the pixel on the depth texture is closer to the light
   // source than the pixel in the normal render is to the light source, we know the pixel is in shadow, so shade it black!
	if (tex2Dproj(DepthTexture,IN.LightVertexPosition).r < DistanceFromLight - ShadowAdjust) Darkness = 0.5;

	return tex2D(BaseTexure,IN.VertexUVCoords)*Darkness;	// Look up the color from the base texture and shade it.
}

//--------------
// techniques
//--------------
   technique GetDepth
   {
      pass p0
      {
         VertexShader = compile vs_2_0 VS_Depth();
         PixelShader  = compile ps_2_0 PS_Depth();
      }
   }

	technique NormalRender
	{
		pass p0
		{
			VertexShader = compile vs_2_0 VS_Normal();
			PixelShader  = compile ps_2_0 PS_Normal();
		}
	}
I won't go into much detail about all the complexities of shaders. I've tried to put loads of comments in there to help clarify it, but essentially what happens is this ...
Depth Render
Firstly our DBP program asks for a depth render for the light (
STEP 3 above), by setting the GetDepth technique and then rendering the light camera. When that happens, the GPU runs our shader and first calls this function:
OUT_DepthRender VS_Depth(IN_DepthRender IN)
This is the vertex shader. This takes the vertex data for our objects and translates it into something that looks right from the light's perspective. It saves this info and how far this vertex is away from the light. Next the GPU calls ...
float4 PS_Depth(OUT_DepthRender IN) : COLOR
This is the pixel shader. This takes the vertex data calculated before and renders all the pixels which get saved to our depth image. It creates a smooth red representation of what the light sees, using how far the objects are away from the light source to determine how dark the red colour is.
Remember, this red depth image from the lights perspective is attached to all our objects already in texture stage 1. This pixel shader is essentially just updating that texture for them.
Normal Render
Later, when DBP sets the effect technique back to "NormalRender" and updates the camera (
STEP 4 above), the GPU runs this function in the shader ...
OUT_NormalRender VS_Normal(IN_NormalRender IN)
This is the vertex shader for the normal technique. Again, it takes our objects vertex data and translates it into useful data. It figures out how the normal camera views the model and how the light views the model, and saves this out for the pixel shader to use. It also passes on the UV coordinates.
Next the GPU runs ...
float4 PS_Normal(OUT_NormalRender IN) : COLOR
This is the final stage which creates the image we see on screen. You'd expect it to be really complex, but it's not!
- Firstly the distance the pixel is from the from the light is smoothed out into a nicer value.
- Then the key tex2Dproj function is run. This looks at the depth texture stored in stage 1 for the object and asks "if the light is looking at this point in the world, what can it see? Gimme that pixel!"
So right now we have a pixel on the depth texture which describes what the light can see. Perhaps this is an obstruction? Perhaps not? Either way, it's red shade describes how far this object is from the light. AND we also have a distance for how far the pixel we want to draw is away from the light.
With that info we can say that if the object the light can see is closer to it than the pixel is, then the pixel must be obscured from the light. If this is the case, draw it in shadow.
The last line (125) does just that, sampling a colour from the object's base texture, and either drawing it in it's normal colour, or drawing is slightly darker.
Conclusion
So that's about it! There are quite a few steps involved, but the actual code is really quite simple. It's just understanding all the steps involved in drawing shadow pixels and putting them all together. One caveat is there is no smoothing or anything going on here, so the shadows look pretty ugly, but I wanted to keep this all simple.
Hopefully this has been some help to people trying to get their head around shadow shading. I'll try and answer any questions people have.
