First off note that Im not saying I made this shader,
this shader is Neophytes, I only fixed something to get it working and am posting my findings here.
So, the fx file source code;
//
// FX Effect file - Cartoon
//

// Constants
matrix wvp : WorldViewProjection;
matrix world : World;
matrix worldIT : WorldIT;
float4 eyePos : EyePosition;
float4 lhtDir < string UIDirectional = "Light Direction"; >;

// Model and Texture Names
string XFile = "default.x";
texture toonshade < string name = "shade.bmp"; >;
texture toonedge < string name = "edge.BMP"; >;

//Our base texture
texture basetex < string name = "base.bmp"; >;

technique ToonWithTex
{
	pass p0
	{
		VertexShaderConstant[0] = <wvp>;
		VertexShaderConstant[4] = <worldIT>;
		VertexShaderConstant[8] = <world>;
		VertexShaderConstant[12] = <eyePos>;
		VertexShaderConstant[13] = <lhtDir>;

		VertexShader =
		asm
		{

			// v0  -- position
			// v3  -- normal

			vs.1.1

			dcl_position      v0
			dcl_normal        v3
			dcl_texcoord0	  v6

			// transform position
			dp4 oPos.x, v0, c0
			dp4 oPos.y, v0, c1
			dp4 oPos.z, v0, c2
			dp4 oPos.w, v0, c3

			// transform normal
			dp3 r0.x, v3, c8
			dp3 r0.y, v3, c9
			dp3 r0.z, v3, c10

			// normalize normal
			dp3 r0.w, r0, r0
			rsq r0.w, r0.w
			mul r0, r0, r0.w

			// compute world space position
			dp4 r1.x, v0, c8
			dp4 r1.y, v0, c9
			dp4 r1.z, v0, c10
			dp4 r1.w, v0, c11

			// vector from point to eye
			add r2, c12, -r1

			// normalize e
			dp3 r2.w, r2, r2
			rsq r2.w, r2.w
			mul r2, r2, r2.w

			// e dot n
			dp3 oT1.x, r0, r2

			// l dot n
			dp3 oT2.x, r0, -c13

			//Dump our basetex's coords into oT0.
			mov oT0, v6
		};

		Texture[2] = <toonshade>;
		Texture[1] = <toonedge>;
		Texture[0] = <basetex>;

		MinFilter[0] = Linear;
		MagFilter[0] = Linear;
		MipFilter[0] = Linear;
		MinFilter[1] = Linear;
		MagFilter[1] = Linear;
		MipFilter[1] = Linear;
		MinFilter[2] = Linear;
		MagFilter[2] = Linear;
		MipFilter[2] = Linear;

		AddressU[2] = Clamp;
		AddressV[2] = Clamp;
		AddressU[1] = Clamp;
		AddressV[1] = Clamp;
		AddressU[0] = Wrap;
		AddressV[0] = Wrap;

		ColorOp[0] = SelectArg1;
		ColorArg1[0] = Texture;

		ColorOp[1] = Modulate;
		ColorArg1[1] = Texture;
		ColorArg2[1] = Current;

		ColorOp[2] = Lerp;
		ColorArg1[2]= Texture;
		ColorArg2[2] = Current;

	}
}
The problem with Neophytes was where he said "add this new technique underneath the first technique to make it accept textured objects". Instead, just replace the first technique with Neophytes texture-accepting version and it'll work.
Here's some simple source code (you'll need to supply a texture);
load effect "cartoon.fx", 1, 0

rem Load our images
load image "edge.bmp", 2
load image "shade.bmp", 1
load image "base.bmp", 3

make object sphere 1,10

rem Assign our images to texture stage indexs
texture object 1, 0, 1
texture object 1, 1, 2
texture object 1, 2, 3

set object effect 1, 1
set object light 1,0

rem New and improved version of the Cartoon.fx effect
set effect technique 1, "ToonWithTex"

rem Vector for our lhtDir constant
null = make vector4(1)

while spacekey() = 0

turn object left 1,.1
pitch object down 1,.1

rem Control light position using mousex
position light 0,mousex()-320,240-mousey(),-300

rem Make sure our light is constantly pointing at the object
point light 0, object position x(1), object position y(1), object position z(1)

rem Update the light direction
set vector4 1, light direction x(0), light direction y(0), light direction z(0), 1.0

rem Make sure the direction constant is constantly updated
set effect constant vector 1,"lhtDir",1

endwhile
And here's the images I use; (they're bitmaps but really small so it shouldnt be too bad)
Edge Image:

To make the black outline around the object bigger, increase the length of black in the edge.bmp.
Shade Image:

Note: The more black you use in the shade image, the better the outcome. In most cases I recommend just using a completely black image, which can be 1px X 1px. However if you'd like an overlay effect, then use some colour starting frmo the right and going to the left as far as you think is good. IMO the more black the better the outcome, however this is only if you're using a textured object, if not then go ahead and throw on any colours you want.
And the base.bmp is whatever texture you'd like.
Using the code above, my own uv mapped object and a texture I threw together, I got this;
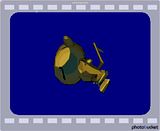
I havent changed the lighting so it can look better than that, but its an example.
ALSO:
Cartoon Shading doesnt work well on "hard" objects, things like cubes and plains mainly. To fix this, you have 2 options.
A) Dont use rectangular models

B) Subdivide your models and move them out, sort of "inflating them", the more inflated/sphereical an object is the better the outcome.
HOWEVER: The polycount of the model bares no effect if it's hard, so using a 30000 poly cube will look the same as using a 24 poly cube.
Goodluck,
- RUC'
Your signature has been erased by a mod because it's larger than 600x120...
