Sorry your browser is not supported!

You are using an outdated browser that does not support modern web technologies, in order to use this site please update to a new browser.

Browsers supported include Chrome, FireFox, Safari, Opera, Internet Explorer 10+ or Microsoft Edge.

2D All the way! / [STICKY] Tutorial On 2D Final Fantasy Game

Author
Message
Reaperman
20
Years of Service
User Offline
Joined: 9th Sep 2003
Location: Kent, England
Posted: 16th Jul 2004 04:41 Edited at: 16th Nov 2005 19:23
Hello everyone, its nice to be back with you all again.

As my daughter said above, I have been quite ill for a while, and I have also been getting ready to get married…plus I am now trying to sort out moving down Kent…So with everything going on I just have not had chance to get on here. I do hope your not all out for my blood just yet.

To answer the main two questions that have been posted before this.

For LordDario

1. If the problem is with the GET IMAGE command, you can instead load the picture of the water in to your favourite paint package and just copy the top half of the sea view.
(Your will be copying from 0,0 to 640,255...That is exactly half the image of the sea picture.)

Save it under a name like “Topofsea.bmp” and then change the code in the first tutorial. You will need to remove the reference to the GET IMAGE and replace it with Load Image “topofsea.bmp”,2.

The sprite command will then put your new image on screen no problem and Dark Basic will not crash out on you.

For Endante Spellogist:

2. You cannot do anything with the island map as this part of the tutorial is for that. Sorry if I confused you, but I put the picture of the island map in the first of the tutorials so that I could carry on in this section.

Ok…Well…On with the show.

This second section on the tutorial will cover simple routines to move about and interact a little with the map. Remember, this is to give you ideas and to encourage you to dig into the code yourself and mess about with it. Feel free to add or delete bits of code to see what it does…You can include parts into your own games too…Just have fun and you will find you will learn much faster.

So lets start level 2 shall we…Here it is.


Tutorial 2: Island Interaction


sync on
sync rate 30
color backdrop 0
hide mouse

The first sections should by now be self-explanatory to you. The commands set the speed of the drawing refresh (Frames Per Second) using the SYNC RATE command and specify that you have to manually update the refresh using the command “sync” within your game.
It also sets the backdrop to black and hides the mouse pointer.

Co=RGB(240,255,35):ink co,1
LOAD MUSIC "world.mid",1
loop MUSIC 1

Next we set the ink colour for any printing we have to do and we load in a little midi file to play for the main world music.
The LOOP command will just play the music forever when it gets to the end. With this midi file the music does not loop seamlessly so you will hear a pause before it starts again. Just replace the “World.mid” with any music file you want to if you don’t like it.

Now we load in all the graphics….quite a few of them.

*Side Note: Some people have emailed me and asked me why I don’t shorten the posts by using more advanced programming methods. They ask, for example, when I don’t use a For/next loop with variables to load in all the graphics. My answer is simply this… The aim of the tutorials is to make it very easy for total newcomers to understand and to clearly see what is going on. It would serve no purpose to compact the code and make it hard for them to be able to grasp what is going on and to then try and adapt it for their own use. I don’t apologise for making the posts long, as its not a hardship for newcomers to read it as they don’t know any other ways to do the things in the first place.*

load bitmap "towntext.bmp",1
load image "spectre.bmp",99
load image "mouse.bmp",100
load image "spriteicon.bmp",101
load image "mapmarker.bmp",102
load image "hannanoia.bmp",103
load image "garanak.bmp",104
load image "kyacca.bmp",105
load image "marinda.bmp",106
load image "toceda.bmp",107
load image "lishom.bmp",108

The above loads in all the usual things, like the bitmap file for the text in the game (towntext.bmp) and also images for a new mouse, your character, a movable enemy (which is NOT used in this tutorial but I put it in so that you could experiment with the idea of having it being in a place which intersects with your movement routine. So if your moving to the cave you may run in to the enemy icon which would instigate a random fight. If you don’t want it in the game just remove the reference to it), a map marker for when you move about the map and of cause the images of your team. (Although we don’t use the images of your team in this section of the game, they are used in the fight section.)
Each is loaded in to its own bank for storage, EG: load bitmap "towntext.bmp",1 means: load the bitmap called “Towntext.bmp” in to bank number 1.

load image "knottla.bmp",109
load image "sha.bmp",110
load image "enthia.bmp",111
load image "shrine.bmp",112
load image "keth.bmp",113
load image "estate.bmp",114
load image "castle.bmp",115
load image "info.bmp",116
load image "sorry.bmp",117

In this section we load in the graphics for all the location descriptions. These will be used to change the info box when your looking at a location. There is also a simple “sorry” icon that’s used if you try to pick something from the village menu that is not there.

load image "choicetown1.bmp",120
load image "choicetown2.bmp",121
load image "choicetown3.bmp",122
load image "choicetown4.bmp",123
load image "choicetown5.bmp",124

These images are used to highlight the main town menu. They “lift” out the words just like a rollover button would do on a web page.

load image "armourertown.bmp",125
load image "weaponsmithtown.bmp",126
load image "innkeepertown.bmp",127
load image "storekeepertown.bmp",128

These are the images for the town amenities. In the game every town/area can be different so not every place will have everything. But when you come to a place that has an inn then the image is changed to number 127 because that is where the picture of the inn keeper is stored.

load bitmap "islandmap.bmp",0
sprite 101,65,370,101
sprite 99,165,320,99
SPRITE 1000,319,313,116
SPRITE 120,10,10,1250
SPRITE 117,120,10,1250
POSITION MOUSE 10,10

Ok finally we load in the main island image directly on to the default screen. This is your map and contains all the different locations for the game. We also set the sprites (your character, the movable enemy, the location description box) and we put two other sprites on the screen using fake image numbers. We do this to ensure that they will be drawn in the right order as Dark basic classic draws sprites in the order they are first written to the screen. Dark basic Professional has a sprite priority command to get around this limitation.

Next comes the variable listing.

ap=0
yml=1
gold=300
ga=0
food=5

The variables are used in other areas of the game, but what they are is:
yml=your map location
ga=variable to denote if your using an inn/store etc
ap=amount of money your going to pay for a service
gold=amount of money you have
Food=amount of rations you have

You could decrees the food amount variably depending on where the player walks to in the game. For example, if your standing in the location of Sha and you walk to the caves, then that is quite a distance relatively speaking, so at the end of the walk you could deduct 3 rations as each ration is enough for 1 whole day for the team. But you can do what you want with this variable, its up to you.

Next we have the main do/loop.

do
mx=MOUSEX()
my=MOUSEY()
SPRITE 1,mx,my,100
ucm=MOUSECLICK()
if ucm=1 then gosub areacheck
gosub zonecheck
gosub moneyamount
sync
loop

What this does is simple. First it sets the position of the graphic mouse pointer to where the real hidden mouse pointer is. The location of it is held in the variables mx and my. We then put the graphic mouse on screen at these mx/my positions using the SPRITE command.

Next we set a variable (ucm=User Clicking Mouse) and we test it to see if they are clicking it and if so we jump (GOSUB) to a routine labelled “areacheck”.

Regardless if the mouse is pressed, we next jump to another routine called “moneyamount”
We then update the display using SYNC and LOOP the entire thing again.

The next routine looks to see if the mouse is in a specific part of the island map and if so it shows the location information about that area in a text box at the bottom right of the screen.
Here is the routine.

zonecheck:
if mx>=65 and mx<=103 and my>=365 and my<=387
SPRITE 1000,319,313,109
endif
if mx>=226 and mx<=260 and my>=315 and my<=335
SPRITE 1000,319,313,110
endif
if mx>=160 and mx<=189 and my>=175 and my<=184
SPRITE 1000,319,313,111
endif
if mx>=293 and mx<=327 and my>=133 and my<=163
SPRITE 1000,319,313,112
endif
if mx>=455 and mx<=475 and my>=208 and my<=226
SPRITE 1000,319,313,113
endif
if mx>=579 and mx<=606 and my>=65 and my<=87
SPRITE 1000,319,313,114
endif
if mx>=160 and mx<=228 and my>=198 and my<=248
SPRITE 1000,319,313,115
endif
Return

Its fairly easy to understand so lets look at a single line of it as they all do the same thing:

if mx>=65 and mx<=103 and my>=365 and my<=387
First the routine checks to see if the mouse locations (mx and my) are within a zone. This zone is an imaginary box that we create around one of the main map locations.
SPRITE 1000,319,313,109
If the mouse pointer was hovering within the zone then the routine sets the info sprite to a new image which displays the location information.
endif
The routine closes the IF command with the ENDIF command.

Moving down the listing we see the areacheck routine.

areacheck:
if mx>=65 and mx<=103 and my>=365 and my<=387 then clickedon=1:gosub readcoords:SPRITE 120,10,10,120:gosub picwindow
if mx>=226 and mx<=260 and my>=315 and my<=335 then clickedon=2:gosub readcoords:SPRITE 120,10,10,120:gosub picwindow
if mx>=160 and mx<=189 and my>=175 and my<=184 then clickedon=3:gosub readcoords:SPRITE 120,10,10,120:gosub picwindow
if mx>=293 and mx<=327 and my>=133 and my<=163 then clickedon=4:gosub readcoords:SPRITE 120,10,10,120:gosub picwindow
if mx>=455 and mx<=475 and my>=208 and my<=226 then clickedon=5:gosub readcoords:SPRITE 120,10,10,120:gosub picwindow
if mx>=579 and mx<=606 and my>=65 and my<=87 then clickedon=6:gosub readcoords:SPRITE 120,10,10,120:gosub picwindow
if mx>=160 and mx<=228 and my>=198 and my<=248 then clickedon=7:gosub readcoords:SPRITE 120,10,10,120:gosub picwindow
Return

Once again this routine is easy to understand, tho is a little more involved that the zone check routine.

if mx>=65 and mx<=103 and my>=365 and my<=387 then clickedon=1
Just like the zone check routine it checks to make sure your clicking within a specific area as you could be clicking the mouse anywhere for all it knows. If you are clicking the mouse within the area then it sets a variable. This variable is used later on, but basically the variable goes from 1 to 7 which will (later on) specify which location you have clicked on. For example, clickedon=1 means that you have clicked on the village of Knottla. Clickedon=2 means than you have clicked on the village of Sha, etc etc.

gosub readcoords
The routine jumps to another routine that will display your movement from your location to the new location you have just clicked on.

SPRITE 120,10,10,120
We then put the sprite on the screen that shows the picture of the town you have just moved to.

gosub picwindow
Finally we jump to a routine for the town.

And, as luck would have it, the very next routine we come to is the one for the town. What a coincidence!

picwindow:
POSITION MOUSE 100,120
`do this loop until you click the right mouse
repeat
mx=MOUSEX()
my=MOUSEY()
` limit mouse to pick box area
if mx<28 then mx=28
if mx>135 then mx=135
if my<35 then my=35
if my>165 then my=165
`##############################
SPRITE 1,mx,my,100
ucm=MOUSECLICK()
if ucm=1 then gosub menuselection
gosub pickzonecheck
sync
until MOUSECLICK()=2
delete sprite 120
return
`###############################################
`if mouse is over an area then highlight the text
pickzonecheck:
if mx>=31 and mx<=93 and my>=41 and my<=50
SPRITE 120,10,10,121
endif
if mx>=29 and mx<=119 and my>=74 and my<=86
SPRITE 120,10,10,122
endif
if mx>=31 and mx<=53 and my>=109 and my<=121
SPRITE 120,10,10,123
endif
if mx>=31 and mx<=65 and my>=144 and my<=157
SPRITE 120,10,10,124
endif
Return

Now folks, quite a lot is going on here so lets walk through it…….


POSITION MOUSE 100,120
We move the mouse to within the blue box menu on the town picture…

repeat
We start a REPEAT UNTILL loop here…You will see why later.

mx=MOUSEX()
my=MOUSEY()
Set the mx/my variables up for the mouse pointer.

if mx<28 then mx=28
if mx>135 then mx=135
if my<35 then my=35
if my>165 then my=165
The above lines limit the movement of the graphic mouse pointer to within the blue box.

SPRITE 1,mx,my,100
Put the mouse pointer on the screen.

ucm=MOUSECLICK()
if ucm=1 then gosub menuselection
Sets up the “Is the mouse being pressed by the user” routine again and then checks it. If your clicking the mouse it will jump to the menuselection area routine.

gosub pickzonecheck
Even if your not clicking the mouse it jumps to pickzonecheck routine.

sync
Updates the display for you.

until MOUSECLICK()=2
We do this loop until you click the right mouse. When you do the loop will exit. This way you can return to the main island map so that you can move again.

delete sprite 120
return
When you exit the routine by pressing the right mouse button we delete the town icon and return to where we first jumped from.

Now, on of the town menu routines from above jumped to the pickzonecheck routine which looks like this:

pickzonecheck:
if mx>=31 and mx<=93 and my>=41 and my<=50
SPRITE 120,10,10,121
endif
if mx>=29 and mx<=119 and my>=74 and my<=86
SPRITE 120,10,10,122
endif
if mx>=31 and mx<=53 and my>=109 and my<=121
SPRITE 120,10,10,123
endif
if mx>=31 and mx<=65 and my>=144 and my<=157
SPRITE 120,10,10,124
endif
Return

All this does is to look at where the mouse is, and if it is hovering over some letters in the blue menu box, it then highlights them and makes them “jump out” like a rollover button would. Its a pleasing way to highlight a menu. To accomplish this the sprite 120 just changes its picture to either 121,122,123 or 124.

Simple but effective.

The menuselection area is what you set up for each town you visit because within each location you may, or may not have an inn, a weapon smiths, a store or an armourers.

I have only programmed this area for the town of Enthia, and I leave YOU to duplicate the routines for the other areas. You know by now that I do this, as its pointless having a tutorial with everything done in it…but if you get stuck I will help you.

First we check Enthia for NO amenities….

menuselection:
############################
if mx>=31 and mx<=93 and my>=41 and my<=50 or mx>=29 and mx<=119 and my>=74 and my<=86 and yml=3
SPRITE 117,120,20,117
wait 1000
delete sprite 117
Endif

This just looks to see if your mouse is hovering over the weapon smith or the armourers text. Because Enthia only have a store and an inn, when you try to click within the armours or weapon smith zones we put a sprite on screen which tells you that your choice in not available.
We then delete that sprite and end the if/endif routine.

Did any of you notice something?

No?….Well look again at the if mx>=31 line and right on the end of it you will see the variable that keeps track of your map location. What this is for is because, as I said earlier, every location on the main island map can have any type of combination of Inn/Store/Weaponsmith/Armourer. We make sure using this variable that ONLY when your in Enthia (Enthia’s map location in this game is number 3, hence YML=3) will you get the “Sorry, that’s not available” sprite on the screen. If you want to add your own location you just use that variable to make sure that if a player picks a menu choice AND there is that choice available within that specific map location then you will be able to ..if not you get the “Sorry” sprite.

However…if you DO click on the Inn text (as an Inn is available at Enthia) then this is what happens……

`###########################
if mx>=31 and mx<=53 and my>=109 and my<=121 and yml=3
Clicking on the Inn text….
SPRITE 120,10,10,127
Change the town picture so that the Innkeeper appears in the top left corner…
POSITION MOUSE 10,60
Move the hidden mouse just under the picture of the Innkeeper…

mx=MOUSEX()
my=MOUSEY()
SPRITE 1,mx,my,100
Move the hidden mouse to the co-ordinates where the real mouse is (just under the picture of the Innkeeper) so that its not in the way of any text…

ga=3
Sets the variable to 3 (as number 3 means the 3rd choice down on the list, which is an Inn)

gosub towninfo
Jumps to the routine to display text on top of the sprite.

endif
Ends the IF command.


If you have picked the store in Enthia, well the same type of this happens as it did for the Inn…

if mx>=31 and mx<=65 and my>=144 and my<=157 and yml=3
SPRITE 120,10,10,125
POSITION MOUSE 10,60
mx=MOUSEX()
my=MOUSEY()
SPRITE 1,mx,my,100
ga=4
gosub towninfo
endif

Between this last ENDIF command and the RETURN command, you can add the rest of the locations, just like Enthia. So do them for Knottla, the Cave, the Castle etc….

return
Jumps back to where you came from originally.


Ok the town info section basically grabs a section of text from a hidden screen (screen 1) and displays it on the town picture. With Dark Basic Classic you cannot print text on top of a sprite, so I use this way to change pre-designed text into a sprite. You could (if you wanted to try it) write a simple routine to PRINT text to a hidden screen, and then grab that text as a sprite… I just designed the text in a paint package and saved it out as a bitmap, but you could do it by printing it to the hidden screen…Your choice….Have a go.

towninfo:
SET CURRENT BITMAP 1
Change all drawing operations to the hidden screen. We do this so that when you GET the image the image is taken from the hidden screen and NOT the default screen.

If ga=1 then GET IMAGE 98,0,0,285,145
If you choose the Armourer text on the blue menu (ga=1 means armourer) then we get the correct text to display.
ap=300
We set the Amount Paid (ap) to 300 as that is what the Armourer will charge you for repairing/upgrading your armour.

I then (because you have to do it!) say this:
`####Do an input routine here to upgrade weapons or not...like Yes/No for store
`########################################
Don’t worry…you will see what I mean lower down.

On the other hand, if you picked the Weaponsmith text then..guess what…
If ga=2 then GET IMAGE 98,0,152,268,270
Yep…Grab the correct text from the hidden bitmap ready to display it.
ap=500
Set the amount to 500 gold as that’s what the weapon smith wants to improve your weapons.
And…again…
`####Do an input routine here to upgrade Armour or not...like Yes/No for store
`#########################################

So how do we do it if its for the Inn then?

Well…..

If ga=3
If you picked n03 on the menu(Inn)

GET IMAGE 98,0,323,272,454
Grab the right text for the Inn to display.

SPRITE 117,58,10,98
Display the text you just grabbed.

LOAD MUSIC "ashplant.mid",2
stop music 1
Load the music for the Inn and stop the Island map music. You have to stop one before you start another. I added this music to it so that you know your in a new area. If you use this program as a basis for your own game try and add music or sound effects to all the various areas…If sets atmosphere and makes the game more enjoyable.

LOAD SOUND "peopletalkfin.wav",2
SET SOUND VOLUME 2,100
I also loaded in a sample of people talking (as they do in an Inn) and set the volume to the highest I could so that it could be heard while the music played.

loop music 2
play sound 2
Just loop the music and play the sounds!

The next line is a temporary line.....remove it when your ready to add the choices to this section. The choices will be by input (as you will see in the final bit for the store) so just use the basic store input routine for all the three other choice routines above. In other words…Modify the input routine from the store for the Weaponsmith/Armourer and Inn.

wait 6000:end
Ends the program.
`#############################################################################
Endif
Ends the IF command.

`#####add rest of Food/Drink/Rest/Nothing choice here...Just like in the Yes/No input routine below for the store.

Ok we now get to the store. This is a complete routine and provided you have followed and read the last 3 routines above, you will be able to use this routine to complete all the others that you may want to put in the program…so read it and don’t skip it….as I know some of you do.

If ga=4 then GET IMAGE 98,0,475,277,605
If you have chosen the Store (4th text down on menu, so ga=4) then grab the correct text from the hidden bitmap.

SPRITE 117,58,10,98
Display the text.
ap=25
Set amount to pay to 25 gold as that is what it costs for rations.

Now the input routine. Very simple stuff here…

`###input routine for Yes or No####################
do
Start a do loop…
A$=inkey$()
Set A$ to the keyboard. Anything you press will be stored in the variable A$.

if A$="y" or A$="Y" or A$="n" or a$="N" then exit
This checks if your pressing Y or N. It looks for upper and lowercase. IF you are pressing the correct keys then it will EXIT the do/loop. If not it will stay within it forever.

sync
Update the display.

Loop
Just keep looping the DO.

Ok so when you eventually press either Y or N the above routine exits and the program falls through to this bit of programming:

if a$="y" or A$="Y" then gosub enough
If you said YES I want something from you so give it to me by pressing the Y key, then the program jumps to a routine.

However, if you said NO I don’t want anything from you by pressing N, then…

if a$="n" or A$="N"
GET IMAGE 98,0,664,70,687
Grab some text from the hidden bitmap.

SPRITE 117,58,10,98
Put it on screen.
You could say anything to them of cause. If they have already bought something from you, you could thank them. If they did not you could tell them to take a long walk of a short cliff. but me…I just say “Goodbye”. Boring I know.

wait 2000
We wait for 2 seconds.
if SPRITE EXIST(117)=1 then delete sprite 117
If the above sprite exists we delete it.

endif
End the IF command

SPRITE 120,10,10,120
Reset the main blue menu thereby getting rid of the store keeper etc.

Return
Jump back to where you were.

The enough routine if for your money and what you want to buy.

enough:
`###enough money to pay
if gold-ap>0
If you have more than ZERO gold AFTER you deduct the Amount Paid(ap) then hey…your rich enough to afford what you need.

gold=gold-ap
So we take the ap from the gold amount.

gosub moneyamount
Jump to a routine to display what you have left in money.

GET IMAGE 98,0,730,80,750
Grab an …er…ok…you already know what this does!!

SPRITE 117,58,10,98
And then…er…ok…I know I know…you already know this bit too!!

wait 2000
Pause for 2 seconds
endif
End the IF command

But oh dear...Your not as flush as you thought you were….well…..

`###not enough money to pay
if gold-ap<0
After deducting the ap from your gold you have less that zero…..your broke…go get a job your sponger!!

GET IMAGE 98,0,700,246,722
SPRITE 117,58,10,98
wait 2000
Endif

I am NOT going to say what those 4 lines do yet again.

if SPRITE EXIST(117)=1 then delete sprite 117
If the sprite is there, delete the sprite

return
Just return to the gosub.

The money amount bit I did do but I left it as a rem statement as there are many many ways to represent money and food within a game I you may want to code a routine yourself.

`###########################################
moneyamount:
`Use this area to either print the amount of food and money you have
`or design a sprite and use it to denote how much you have.
`for example, if you want to just print out the amount you would use a routine like this:
`set cursor 400,10
`print "Rations:";food;" Coins:";gold
`So play about a bit and see what you can come up with.

return
Guess!


The final routine is for moving the mappointer sprite on the screen.

Instead of moving the little character from one place to another I decided to make it look like it does on those old films where you see a series of dots appear on the map to show the course your player is taking.

I was tempted to use a READ/DATA command or even an array to hold this data in, but then I thought no…there is another way.

The way I chose was to use a file for storing the data. Newcomers to the language may not have thought of using this system as most times its used for saving text and things like that and not for games as such, so I thought it would be a novel approach for a newcomer to see.

Here is how it works…

readcoords:

`####where are you and where do you want to go####
if yml=1 and clickedon=3 then map$="knotttoenthia":yml=3
`####just do that for all the text files you have to plot####

As the above says, you just check the yml variable and the clicked on variable and provided your not trying to travel to somewhere you already are, you can assign the map$ variable to the name of the correct text file. In this case the text file is called “knotttoenthia”. You then change your position on the map to yml=3, which means your in Enthia. I have supplied other movement data in text files within the downloadable zip.
See if you can (using the easy formula above) get your man to move from Knottla to the Cave…Go on…its easy and you will be able to do it.


OPEN TO READ 1,map$
We then open the file to read its contents…

for t=1 to 100
Start a larger for next loop. The data in the text files are NOT as big as a 100 loop, but I am afraid I could not find any Dark basic command to find out the number of items in the file so I could set the for/next loop up exactly. However, this is worked around within this routine.

READ STRING 1,x$
READ STRING 1,y$

Read the X and Y co-ordinates held in the file and assign them to x$ and y$

x=VAL(x$)
y=VAL(y$)

Extract the values from the strings and put them in numerical variables x and y


sprite 103,x,y,102
paste sprite 103,x,y

Put a sprite at the x and y co-ords and then paste it on to the screen.

eof=FILE END(1)
if eof=1
t=100
DELETE SPRITE 103
Endif

The bit above looks to see if the eof (end of file) has been reached. If so it sets t (the variable in the for/next loop) to 100 so that the loop will end.
It also deletes the last sprite map marker as that would be put at 0,0 which we don’t want.

wait 250
Pause for a little bit..
sync
Update the screen…
next t
Loop the FOR command and add 1 to T

After the for/next loop is over just close the file and return…
close file 1
Return

And that as they say is that.

I hope you have enjoyed this second part to the tutorial and I will post the last section, the fighting tutorial later this week. I’m not going to say a set time/day as something always seems to happen to stop me posting it!...LOL...But It will be in this week and it will be in its entirety.

Any problems let me know.
Reaperman
20
Years of Service
User Offline
Joined: 9th Sep 2003
Location: Kent, England
Posted: 16th Jul 2004 04:49 Edited at: 16th Jul 2004 05:16
Hear is the listed code.
Will post the download links in a moment..just uploading them.

* Here is the link for the download
http://myweb.tiscali.co.uk/freelance/RPG2.zip

Please feel free to change any part of the listing/graphics etc.
The Dark Padawan
20
Years of Service
User Offline
Joined: 5th Aug 2003
Location: USA!
Posted: 20th Jul 2004 07:04
Wow this is good
I'm kinda of still a newb
and its still teaching me

"Nintendo GameCube is the best"
"I'm back! and Darker than ever!!!"
DaedalusX
20
Years of Service
User Offline
Joined: 10th Mar 2004
Location:
Posted: 22nd Jul 2004 00:50
this has been very helpful. by the way hope u like kent i live in kent and it rocks!

Daedalus
lokatsis
20
Years of Service
User Offline
Joined: 11th Feb 2004
Location: greece
Posted: 25th Jul 2004 01:26
hey reapeman i'm glad to see that you have returned back. i'm gonna test your new tutorial now and i hope that you gonna keep helping us the noobs!

THE AOOS
Iceman
21
Years of Service
User Offline
Joined: 10th Jan 2003
Location:
Posted: 2nd Aug 2004 22:10
Hey Reaper.....Class stuff there!
I cant wait to see the last tut on the fighting.

Its great to see someone who knows what there doing taking the time to help noobs.....Its what this board is all about. Kudos to ya Reaper.
GeekHead
19
Years of Service
User Offline
Joined: 12th Aug 2004
Location:
Posted: 12th Aug 2004 11:02
reaperman i can't wait till you come out with the next part i am a totaly noob with darkbasic and your tutorials is helping me out alot. Keep them coming i will sure be glad to have more tuts by you as time goes on.
Cian Rice
19
Years of Service
User Offline
Joined: 8th Jun 2004
Location:
Posted: 7th Sep 2004 02:50
My friend only has DBC and I'm wondering for him will this work in DBC and DBPRO.

Got anime?I do.
x1b
19
Years of Service
User Offline
Joined: 19th Sep 2004
Location:
Posted: 20th Sep 2004 01:01
The compiled RPG1 works. If I compile RPG1 then execute, it spits out errors.

Compiling and executing RPG2 results in:

3502 - could not load music at line 9

line 9 and 10 are:

load music "world.mid",1
loop music 1

world.mid is present in the same directory as the source as well as all other files.

DBPro 5.6 upgrade w/ Enchancements and EzRotate

- This message is made of 100% recycled bits and bytes
x1b
19
Years of Service
User Offline
Joined: 19th Sep 2004
Location:
Posted: 20th Sep 2004 07:28
Ok,got that figured out.

Now when I compile RPG2 w/ all media included I get
runtime error 501 - image number illegal at line 51

line 51 is "SPRITE 120,10,10,1250"

- This message is made of 100% recycled bits and bytes
x1b
19
Years of Service
User Offline
Joined: 19th Sep 2004
Location:
Posted: 20th Sep 2004 07:51
Quote: "3502 - could not load music at line 9

line 9 and 10 are:

load music "world.mid",1
loop music 1"


Solution was to give DBPro the absolute path. such as C:\Documents and Settings\x1b\My Documents\DarkBasic\RPG2


Quote: "Now when I compile RPG2 w/ all media included I get
runtime error 501 - image number illegal at line 51

line 51 is "SPRITE 120,10,10,1250""


Answer was to reduce 1250 to 125. This occured to me as I realised that all the other digits where in the hundreds and not thousands.


You will need to copy all of RPG1's contents into RPG2's directort else you very well may see incomplete maps and mostly blue background where you expect graphics.

- This message is made of 100% recycled bits and bytes
Nookii
20
Years of Service
User Offline
Joined: 29th Jan 2004
Location:
Posted: 23rd Sep 2004 20:35
Hows The 3rd Part Coming Along Dude!!

Every Time You Read This Will Make Your Life A Few More Seconds Less

Read Whats Important... Not Whats Pointless
Reaperman
20
Years of Service
User Offline
Joined: 9th Sep 2003
Location: Kent, England
Posted: 28th Sep 2004 04:22
Thank you for answering User, X1B. I did not have a chance to.

Dreamly... The 3rd part is finished. It has been for some time now. But it was on the old drive that went down and I have only just recovered it. I will post it soon for you.

It always seems to happen to me...When I say "Will post it this week" you can bet that sods law starts thinking, 'Mmmm, have to pay a visit to Reaperman.'
Final Epsilon
20
Years of Service
User Offline
Joined: 26th Jan 2004
Location: CA, USA
Posted: 28th Sep 2004 05:41
whoohoo! now we just gotta wait. ^_^
x1b
19
Years of Service
User Offline
Joined: 19th Sep 2004
Location:
Posted: 29th Sep 2004 08:01
No problem Reaper. I strive to answer my own questions but I like to inquire on forums as well incase I get a reply before I figure out my query.

Really looking forward to the 3rd from you.

I have legal versions of DBPro,Cartography Shop4,EzRotate and Enchancement packs,BlueGUI,MilkShape 3D (registerd),CharacterFX (registerd),FlashMX 2K4 if I can give you a hand with anything.

I'm currently working on my own SciFi/Medival Fantsy3D MMORPG with a friend who has been commiting every weekend Fri to Sun with me to developing. Alot of your work has inspired us both.

I my self understand and do somework with Maya 6 and SoftImage XSI

- This message is made of 100% recycled bits and bytes
x1b
19
Years of Service
User Offline
Joined: 19th Sep 2004
Location:
Posted: 6th Oct 2004 06:30
Still no Part III huh Reaper =/

- This message is made of 100% recycled bits and bytes
Reaperman
20
Years of Service
User Offline
Joined: 9th Sep 2003
Location: Kent, England
Posted: 20th Oct 2004 10:25
x1b.....

As I said, it was on the old drive that went down and I have only just recovered it and it did loose a few lines of code that I had to put back in. I have also now moved down to Kent and the move was a little hard to say the least.

But I do understand your impatience and now that I have sorted the code out and have finally got BT to move my broadband (not to mention putting in a new line) I will post it for you all. I am sincerely sorry if this wait has caused anyone problems as it was unintentional on my part.
dazzling dazzla
19
Years of Service
User Offline
Joined: 6th Nov 2004
Location: here
Posted: 9th Nov 2004 04:01
Could you tell us what graphics editor you used to make the images and bitmaps from because the designs look brilliant and very reminiscent of the old snes ff series?

the answer to all lives questions is...
... meh!
dazzling dazzla
19
Years of Service
User Offline
Joined: 6th Nov 2004
Location: here
Posted: 10th Nov 2004 04:45
I have a problem with tutorial 2. when i load it and get to the map stage, i click on an area and i get the error message: runtime error at line 266; file does not exist! however this line only consists of the following code:-

for t=1 to 100

could you help us out anybody? please?

oh yeah by the way i love the way its shaping up at the moment coz it brings a strange sense of nostalgia because nobody ever makes sprite games like these anymore except on handheld consoles

the answer to all lives questions is...
... meh!
AJay
20
Years of Service
User Offline
Joined: 24th Jan 2004
Location:
Posted: 5th Jan 2005 03:46
Hey Reaper. This looks like a wonderful tutorial. Im wanting to give it a try. I saw that it was written in DB. I have DBPro, will i still be able to do this tutorial? because it looks really helpful

128MB ATI All In Wonder 9200 AGP video card, 768 MB of Ram, 2.4 Ghz Pentium 4 processor, 768 MB of ram, 64 bit sound blaster live, 40 Gig hard drive. -AJay- Much thanks to Coding Area

PiratSS
21
Years of Service
User Offline
Joined: 18th Oct 2002
Location:
Posted: 14th Feb 2005 00:41
Great work reaper.

And congrats on a sticky.
zy_to ge_ry
19
Years of Service
User Offline
Joined: 20th Nov 2004
Location: Canada
Posted: 16th Feb 2005 10:03
I am having the same problem as dazzling dazzla, however since its a runtime error, the error has to do with the:

OPEN TO READ 1,map$

line.

I have had problems with this before, does anybody know what causes it? The file exists and is in the same directory, and I have also tried setting the dir mannually, still nothing though.
Techno _ Icon
19
Years of Service
User Offline
Joined: 28th Mar 2005
Location: Australia
Posted: 3rd Apr 2005 12:57
what's happening with this tutorial? will it be completed? thanks

Dont eat yellow snow
Reaperman
20
Years of Service
User Offline
Joined: 9th Sep 2003
Location: Kent, England
Posted: 22nd Apr 2005 03:06
Yes Techno_Icon, it will be completed.

The biggest problems I have had with this is:

A) The computer crashed (For “crashed” read “BOOM”)
B) A virus hit the thing and deleted windows. Thought on the whole that’s not always a bad thing!
C) The HD (and motherboard) did not like a lightning storm...Thanks to my daughter Dragon3 for that problem.

Basically, I thought that between work I could use a part backup file of the tutorial and just "patch" it.
But as always, it did not work out like that.
I had to redo or re-get all the media I was using, plus find time to program.

All in all, its been quite a headache really. But yes, it will be finished soon as its all been put back together now for the 3rd part--AND I have copied it on to a CD AND made a back up of the program on a spare HD--Just to make sure.

As for the questions on the read/data and for/next loops…. It sounds to me like you did not put the media in the folder with the game. Just move the media in to the same folder and it will work for you.
animehero
19
Years of Service
User Offline
Joined: 25th Dec 2004
Location:
Posted: 6th Jul 2005 01:56
Sorry i'm a total n00b, but i'm using DarkBasicpro, how do u paste the stuff in using DBpro?
devild0g
18
Years of Service
User Offline
Joined: 14th Jun 2005
Location:
Posted: 27th Jul 2005 13:32
Highlight what you want copied, press and hold "CTRL key" at the same time press "C" key. To Paste it hold "CTRL key" and press "V" key.
Psycho Joker
18
Years of Service
User Offline
Joined: 13th Jul 2005
Location:
Posted: 28th Jul 2005 00:11
Look at the records part of the code... Its not that hard to figure out. I added another piece of the code so you can see what I mean.
animehero
19
Years of Service
User Offline
Joined: 25th Dec 2004
Location:
Posted: 29th Jul 2005 18:34
sorry my bad, what i meant to say was, how do u paste in the images etc. The maps and everything how do i get them to work on DBpro?
Psycho Joker
18
Years of Service
User Offline
Joined: 13th Jul 2005
Location:
Posted: 3rd Aug 2005 01:13
To find out where to past the images find out what the texture is named and look for it in the code. When you find it look for the sprite or object that it is textured to. From their add another sprite or object and move it accordingly. The source code works in DBC and I don't know how to run it in DBP because I don't have DBP.

Psycho Joker
Duke Dudeston
20
Years of Service
User Offline
Joined: 14th Sep 2003
Location: Darkbasic Pro
Posted: 5th Oct 2005 03:39
wicked, this is the sort of stuff I need, examples on how to put a game together, I get a idea of what the codes do etc... but when it comes to putting them together to make a game it goes right over my head, this tutorial is great!
Reaperman
20
Years of Service
User Offline
Joined: 9th Sep 2003
Location: Kent, England
Posted: 9th Nov 2005 14:34
Glad you like it Duke

And you should also like the fact that I at last get to post the 3rd part tonight...Its been a right pain has this tutorial....Just hope the next tutorial goes a bit faster than the 100 years war!
Tapewormz
21
Years of Service
User Offline
Joined: 15th Sep 2002
Location: Winnipeg, Mantoba, Canada
Posted: 14th Nov 2005 08:24 Edited at: 14th Nov 2005 08:25
[motivation]
FINNISH THIS TUTORIAL! That's an order!

I've raised seven children in the time it's taken your computer to explode, eat itself, regurgitate, puke and explode again.

KILL STUFF! BLAH!
[/motivation]

*Edit*
And here's a penguin...

Reaperman
20
Years of Service
User Offline
Joined: 9th Sep 2003
Location: Kent, England
Posted: 16th Nov 2005 19:40 Edited at: 9th Jan 2006 23:10
Welcome to the last (at last!) section on how to make a FF type game.
Some notes before we begin.

First, you will find all the media (and compiled game exe) in a single zip that you can download at the end of this tutorial. I have put it on to a file hosting area, and not my daughters site, as she’s using it now for her own projects. If ANYONE has any difficulties in downloading the file, please email me or post on this thread and I will send it as a direct link.

Second, please note that this tutorial was originally (100s of years ago ) for DBC and not DBP. However, you can adjust the tutorial for DBP if you need to, and it will work.

Lastly, as I always say, enjoy the tutorial, rip the thing apart, add your own code, and basically just play about with everything. The best way to learn is to do, so feel free to experiment with the code and remember to add your own things to it and to have fun.

*Special Note to Tapewormz*
Sorry about the wait, but congratulations on the 7 kids.


Lets begin.

Fighting Arena
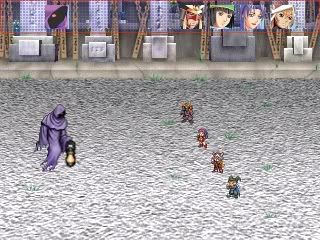


cls
sync on
sync rate 0
color backdrop 0
hide mouse

The first set of instructions (as usual) sets up the screen.
Cls clears the screen.
Sync on and sync rate 0 sets up the manual sync rate (0 being as fast as possible).
Color backdrop 0 sets the background to black.
Hide mouse hides the mouse pointer from view.

Ok, moving on.

We next set up the ink colour using the RGB setting, and again clear the screen.
`########################################
Co=RGB(219,240,251):ink 0,co:cls
`########################################
This colour is used for the sky in the game.
The sprites cover the whole screen in this tutorial, and you would not normally have to set the background to anything but black. But we use a summon monster magic in the tutorial, and the way we display the summons is similar to Final Fantasy Tactics Advance for the GBA.
The big green and nasty summons looks like this:
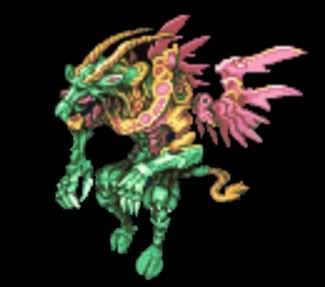
so I wanted to do something else than just "stick it" on to the play area.
Although you could do your summons totally differently and not move the game sprites to uncover the background---its up to you.

(If you rem out this bit, you will see that the sky remains black when you issue the summon command.)

We now load in the music in to bank 1 and then play the music forever (loop)
`########################################
LOAD MUSIC "ff4battl.mid",1
loop MUSIC 1
`########################################
Please use any music you want to. I just put this in because I think it suit’s the game and the fight arena. Remember if you change the music be sure that its format will be usable by the load music command.

Next we load in all the graphics we are using for the game. There is quite a lot of them but as normal, you should be able to change them to your own graphics quite easily.
`########################################
load image "tomb.bmp",65535
sprite 65535,0,0,65535
load image "topofloc.bmp",65534
sprite 65534,0,-160,65534
sprite 4000,200,100,3005
load image "topgrid.bmp",500
load image "smallloc2.bmp",499
load image "a1.bmp",1998
load image "a2.bmp",1999
load image "naddax.bmp",2000
load image "clddk.bmp",2001
load image "cldlt.bmp",2002
load image "0.bmp",2004
load image "1.bmp",2005
load image "2.bmp",2006
load image "3.bmp",2007
load image "4.bmp",2008
load image "5.bmp",2009
load image "6.bmp",2010
load image "7.bmp",2011
load image "8.bmp",2012
load image "downarrow.bmp",2013
`########################################
load image "ghost3.bmp",1000
load image "enemy.bmp",1001
`########################################
load image "garanaklg.bmp",1
load image "mag.bmp",2
load image "wom.bmp",3
load image "kyaccalg.bmp",4
load image "downarrow.bmp",3000
load image "bar1.bmp",3001
load image "bar2.bmp",3002
load image "bar3.bmp",3003
load image "bar4.bmp",3004
`########################################
load image "menu1.bmp",3005
load image "menu2.bmp",3006
load image "menu3.bmp",3007
load image "menu4.bmp",3008
load image "menu5.bmp",3009
load image "menuback.bmp",3010
load image "potionsprite.bmp",3011
load image "potionspritemp.bmp",3012
load image "lifepotion.bmp",3013
load image "menu2back.bmp",3014
load image "sumdrag.bmp",3015
load image "sumphx.bmp",3016
load image "special.bmp",3017
load image "mouse.bmp",3018
load image "riper.bmp",3019
`########################################
This next graphic is used in the damage of your characters/enemy. This could be a single red ‘splat’ or something that makes the character flash white and red etc. However, its an animation of a blood splat and I wanted to show newcomers to the language how to grab multiplex images off a single screen and store them, and this seemed as good a way as any.

So lets take a look at the routine that does this:

########################################
load bitmap "blood.bmp",1
SET CURRENT BITMAP 1
im=3020
x=0:y=0
for dp=1 to 4
for le=1 to 4
GET IMAGE im,x,y,x+128,y+128
inc im
inc x,128
next le
x=0:inc y,128
next dp
`########################################
The first line loads in a bitmap of the blood. Here is what it looks like:
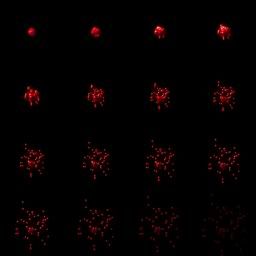

The next line sets the current bitmap to 1. The default is 0, but using this command you can direct all graphic commands to use the new (hidden) bitmap.

Now for the rest of it:

im=3020 ---This is the start number of the first image. Remember, just like storing sounds, music and other things in Dark Basic, you have to put images somewhere, so think of this number as an empty box that your going to put your first image in.
x=0:y=0 --- These are the x co-ord and y co-ord of the top left of the image area to grab.
for dp=1 to 4 --- This is the loop that sets how many lines down the routine grabs. (dp=Depth).
for le=1 to 4 ---This is the loop that sets how many images across the routine grabs. (le=length).
GET IMAGE im,x,y,x+128,y+128 ---Ok, this is saying the following:

Grab an image (get image) and store it in the empty box numbered whatever im is at this time. Start at the x co-ord and y co-ord which will be the top left of the area to grab, and, because each picture fits within a 128 pixel area, set the bottom right x and y co-ords to 128 more…Which forms the area to grab as a square (x,y,x+128,y+128).

inc im --- This just adds a 1 to whatever number im is. Its like the command im=im+1 and does exactly the same, only faster.
inc x,128 --- This adds not a 1 to x but 128 to x. Why? Because if you look at the picture you can see that each image is separated a little and that each picture of the blood fits in to a 128 area. So, after the computer grabs x,y,x+128,y+128 it then has to reset x from what we originally made it (0) to 128.

This effectively moves the x position of the top left co-ordinate 128 pixels to the right, ready for the grab image command to get the next picture on the bitmap.

next le --- loops the length loop. (try saying that quick after a drink!).
x=0:inc y,128 --- After the le loop ends, this line resets x back to 0 (far left of bitmap) and now adds 128 to y. That means that y now drops down 128 pixels. We do this for the same reason we moved x 128 pixels in the other loop.
next dp --- finally we loop the depth loop. This re-runs the le loop again and lets it grab the next set of pictures on the next line down.

The routine continues until dp comes to an end.

Not as hard as you thought eh? By using that routine and modifying the x and y you could grab anything from explosions to character animation, so its useful to know.

Of cause if you needed to grab lots of things and you could not fit them all on to one bitmap, you don’t want to just use a single screen loaded in and then immediately use a grab routine. No, if you did that then you would end up with a huge program because you would have to copy and paste in as many grab routines as there were bitmaps. So what you do is make the grab routine a subroutine that can be recalled time after time.

We use this method in the next bit of code when I wanted to load in separate bitmaps of animations for the player characters.

########################################
im=5
load bitmap "Garani.bmp",1
SET CURRENT BITMAP 1
gosub grabem
load bitmap "woman.bmp",1
gosub grabem
load bitmap "fighter.bmp",1
gosub grabem
load bitmap "magician.bmp",1
gosub grabem
SET CURRENT BITMAP 0
`#######################################
goto start
`#######################################
grabem:
x=0:y=0
for dp=1 to 6
for le=1 to 3
GET IMAGE im,x,y,x+48,y+48
inc im
inc x,48
next le
x=0:inc y,48
next dp
return
`#####################################
The above routine you have just seen before using the blood splat animation. The only difference is that there is a gosub command after each loaded bitmap screen, which jumps to the label “grabem”. Also the pictures on each bitmap will now fit within a 48 by 48 area and not a 128 by 128 area, so we changed the numbers at the end of the get image command to suit.
Each bitmap holds the animated players in a specific way, like this:
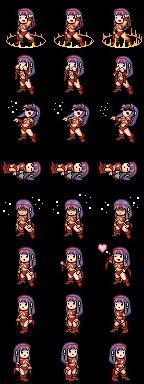

After the last bitmap is loaded we use a simple goto command to jump over “grabem” and go to the “start” label. We would not of cause need a goto command if we had put the “grabem” routine at the bottom of the program, but I did loose most of the code for this program and when I rewrote part of it I left the routine where it was.

Ok, now the main part of the game.
There are some REM statements (denoted by the ` sign) which you should read as they will help you later on.

######################################
start:
`#####################################
`this sets the amount of life everyone has...0=dead.
char1life=100:char2life=70:char3life=30:char4life=10:enemylife=200
`this sets the attack level of everyone.
char1hp=15:char2hp=10:char3hp=5:char4hp=10:enemyhp=20
`this sets the defence level of everyone.
char1def=10:char2def=10:char3def=10:char4def=10:enemydef=25
`########################################################
arx=360:ary=150
s1=8
s2=26
s3=44
s4=62
animflow=1
charplaying=1
lp=10
mp=10
hp=10
flag=0

The above sets up the variables needed for the game. Most of them are used within this program, but some are not. The s1 to a4 variables are used later on to denote which image the player sprites should use in their animations.

for t=1 to 5000
sprite t,0,0,0
next t
This bit sets up the sprite priority as DBC does not have a true sprite priority setting, unlike DBP.
Basically you just put the sprites (in whatever order you need) on screen (you can put them off screen to by using negative numbers) using a non-existent graphic which makes them invisible.
Its just one way to set the sprites up, and there are several others, much better ways, but you will have to experiment yourselves to find them.

`#######################
`un-rem for a blue menu bar
`sprite 500,0,0,500

sprite 104,50,10,1001 --- The menu bar at the top of the screen.
`#######################
sprite 5,300,10,1 --- All the icons for your characters.
sprite 6,380,10,2
sprite 7,460,10,3
sprite 8,540,10,4
`#######################
gosub HP --- A routine to display (depending on variables) your health/life.
`#######################


Ok, lets do the “do”

do

`sprite 1,350,200,s1
`sprite 2,380,250,s2
`sprite 3,410,300,s3
`sprite 4,440,350,s4
`sprite 1000,50,200,1000

mx=MOUSEX()
my=MOUSEY()

ucm=MOUSECLICK()
if ucm=1 then gosub menucheck

gosub waitanim
if flag<1 then gosub arrow

SPRITE 10000,mx,my,3018

wait 100
sync
loop

This you have seen before in the other tutorials. First off we set mx and my to the hidden mouse pointer position on the screen. We do that because we want to put a sprite at the same co-ords as the real mouse to give us a new pointer.
Next we set the variable ucm (User Clicks Mouse) and take a look to see if it =1. If it does then your clicking something and in that case we just have to jump to check the menu to see what you want to pick or not, as the case may be, so we use the gosub command.

We then slow everything down a tad by jumping to a routine that animates the players game sprites while you make your mind up what you want to do.

The line : if flag<1 then gosub arrow -- checks to see if it is your go (at the beginning of your game characters move) and if so, if jumps to a routine that makes an arrow appear above the head of the character to show who’s move it is next.

The Sprite command sets sprite 10000 to the co-ords of the hidden mouse (mx,my) and displays the graphic stored in 3018, which is the new mouse pointer.

Moving ever onwards:

menucheck:
wait 500
do
mx=MOUSEX()
my=MOUSEY()
SPRITE 10000,mx,my,3018
sprite 4000,200,100,3005
if mx>=226 and mx<=293 and my>=114 and my<=134 then SPRITE 4000,200,100,3006:mu=1
if mx>=221 and mx<=297 and my>=162 and my<=181 then SPRITE 4000,200,100,3007:mu=2
if mx>=228 and mx<=287 and my>=212 and my<=227 then SPRITE 4000,200,100,3008:mu=3
if mx>=237 and mx<=285 and my>=257 and my<=275 then SPRITE 4000,200,100,3009:mu=4
gosub waitanim
ucm=MOUSECLICK()
if ucm=1 then gosub menucheck2:exit
if ucm=2 then exit
wait 100
sync
loop
return

This is yet again very similar to the menu check in the second tutorial. It does the following:

wait 500 --- waits for half a second.
Do --- beginning of a do loop.
mx=MOUSEX() --- sets mx to the x co-ord of the hidden mouse pointer
my=MOUSEY() --- sets my to the y co-ord of the hidden mouse pointer
SPRITE 10000,mx,my,3018 --- puts the new sprite mouse pointer on the screen

sprite 4000,200,100,3005 --- this is the menu selection sprite that’s put on screen for you to pick an option from.

if mx>=226 and mx<=293 and my>=114 and my<=134 then SPRITE 4000,200,100,3006:mu=1
if mx>=221 and mx<=297 and my>=162 and my<=181 then SPRITE 4000,200,100,3007:mu=2
if mx>=228 and mx<=287 and my>=212 and my<=227 then SPRITE 4000,200,100,3008:mu=3
if mx>=237 and mx<=285 and my>=257 and my<=275 then SPRITE 4000,200,100,3009:mu=4

All the above 4 lines do is to check if the mouse sprite is within a set of coordinates and if so, then it highlights that option within the menu by changing the image of sprite 4000. It also sets the mu flag to either 1,2,3 or 4. The mu flag is used later to denote which option to display on the sub-menu, such as a list of potions, or an attack type or magic type etc.

gosub waitanim -- Jumps to the player character animation routine to keep things moving in the background.
ucm=MOUSECLICK() --- You should know this one by now!
if ucm=1 then gosub menucheck2:exit --- Click the mouse, jump to the second menu check, then exit the do loop routine.
if ucm=2 then delete sprite 4000:exit --- click the right mouse button and get rid of the menu sprite then just exit the do loop.
wait 100--- well, go on then, guess!
Sync --- refresh the screen
Loop--- loop the do
Return --- when the routine is all over with, return to the gosub.


menucheck2:
Delete sprite 4000--- get rid of the first menu sprite.

Now, depending on which of your characters is fighting......


` ATTACK
if charplaying=1 and mu=1 then sprite 4001,250,130,3017

This is saying, if the first character is fighting, and you have picked option 1 (mu=1) which is to attack, then put a sprite using image 3017 on screen. This is your special fight move, which for character 1 is blindside.

Just make a new gfx for each characters special fighting move and then change the end numbers to match the gfx image number. This for example is for character number 2:
if charplaying=2 and mu=1 then sprite 4001,250,130,3019
Etc.Etc. Just add the same for the other characters.

All the other options are done in the same way, so: ---

` DEFENCE
if charplaying=1 and mu=2 then char1def=char1def+5
` This is for character number 2:
` if charplaying=2 and mu=2 then char2def=char2def+5

` MAGIC
if charplaying=1 and mu=3 then sprite 4001,250,130,3015
` This is for character number 2:
` if charplaying=2 and mu=3 then sprite 4001,250,130,3016

` ITEMS
if charplaying=1 and mu=4 and lp>0 then sprite 4001,250,130,3011
if charplaying=1 and mu=4 and hp>0 then sprite 4002,250,150,3012
if charplaying=1 and mu=4 and mp>0 then sprite 4003,250,170,3013
` This is for character number 2:
` if charplaying=2 and mu=4 and lp>0 then sprite 4001,250,130,3011
` if charplaying=2 and mu=4 and hp>0 then sprite 4002,250,150,3012
` if charplaying=2 and mu=4 and mp>0 then sprite 4003,250,170,3013
` Etc.Etc. Just add the same for the other characters.

The only real difference in the above is the variables mp hp and lp. These denote if you have potions for magic, life or health. You could add your own variables for your own potions and just change the variables to display the new image.

gosub secondmenupick
return

Nope, not going to waste my time telling you what those two lines do.


secondmenupick:
REPEAT
mx=MOUSEX()
my=MOUSEY()
SPRITE 10000,mx,my,3018
`mhs=mouse hitting sprite
mhs=SPRITE COLLISION(10000,4001)
ucm=MOUSECLICK()

Now this second pick routine is a little different to the pick routine in the first menu. It uses a collision between the mouse and the second menu sprite to tell what the mouse is picking.
You can use a picker like the first menu if you must, but this is another way of doing it.

if mhs>0 and ucm=1 and mu=1 then gosub att
This line checks to make sure that the mouse and second menu sprite are hitting each other, AND that the user is clicking the mouse AND that the menu first picked was 1 (attack) and if all that’s correct it jumps to the attack routine.

The same thing applies for the other 3 menus chosen.
if mhs>0 and ucm=1 and mu=2 then gosub def
if mhs>0 and ucm=1 and mu=3 then gosub sum
if mhs>0 and ucm=1 and mu=4 then gosub itm
sync
UNTIL ucm=2 --- keeps doing it until you click the second mouse button.
return


Waitanim:
sprite 1,350,200,s1
sprite 2,380,250,s2
sprite 3,410,300,s3
sprite 4,440,350,s4
sprite 1000,50,200,1000
Put the game sprites on screen.

if animflow=1
inc s1:inc s2:inc s3:inc s4
endif
if animflow=2
dec s1:dec s2:dec s3:dec s4
endif
if s1>=10 then animflow=2
if s1<=8 then animflow=1
return

This routine adds 1 to the variables of s1,s2,s3,s4 (remember them from earlier on?) and then makes sure that the animation is not going over a set number. If it is, then it sets animflow to 2, which makes the routine cycle backwards through the 3 frames of animation, and when its at the correct number again, animflow is set to 1 (forwards) and the process starts all over.

arrow:
flag=1
show sprite 3000
for t=1 to 10
sprite 3000,arx,ary,3000
gosub waitanim
wait 100
sync
next t
hide sprite 3000
return

VERY easy. Just plonks a big arrow over the current character. Jumps to the animation routine, and then does that 10 times before returning to the gosub.


HP:
`character 1
if char1life>75 then char1s=3001
if char1life<75 and char1life>50 then char1s=3002
if char1life<50 and char1life>25 then char1s=3003
if char1life<=25 and char11life>0 then char1s=3004
`character 2
if char2life>75 then char2s=3001
if char2life<75 and char2life>50 then char2s=3002
if char2life<50 and char2life>25 then char2s=3003
if char2life<=25 and char2life>0 then char2s=3004
`character 3
if char3life>75 then char3s=3001
if char3life<75 and char3life>50 then char3s=3002
if char3life<50 and char3life>25 then char3s=3003
if char3life<=25 and char3life>0 then char3s=3004
`character 4
if char4life>75 then char4s=3001
if char4life<75 and char4life>50 then char4s=3002
if char4life<50 and char4life>25 then char4s=3003
if char4life<=25 and char4life>0 then char4s=3004

sprite 3001,300,10,char1s
sprite 3002,380,10,char2s
sprite 3003,460,10,char3s
sprite 3004,540,10,char4s
return

The HP routine looks large and complex but its not. It just checks what level of health you have (Charlife) and depending on what it is, it puts a sprite on top of the character icons on the top area of the screen that represents anything from full health down to danger. So the line :
if char1life>75 then char1s=3001 means if your health is over 75% your good to go so show the full green health bar.
If you’re a bit confused, take a look at the screen and you will see what I mean.

Remember that these routines should be duplicated for each of your characters.

att:
if charplaying=1
<ADD YOUR CODE HERE> ----See the end of this tutorial for more.
endif
return

def:
if charplaying=1
Char1def=char1def+20 --- come on you newcomers, you know this…yes you do!
endif
return

itm:
if charplaying=1
<ADD YOUR CODE HERE> ---Yep. This is something I am leaving YOU to do so you learn.
But to give you a clue: if it’s a health potion, that gives you 25 points of health back, just add 25 to your current health. If you don’t want the player to be MORE healthy than, say 100 points, then write a bit of code that checks the health is not greater than 100, and if it is it sets it to 100.
Im sure you get the idea.
endif
return
Ah finally the summons.

How this works is:

Remove all the sprites that’s on the screen leaving just the background and arena.
sum:
delete sprite 1
delete sprite 2
delete sprite 3
delete sprite 4
delete sprite 5
delete sprite 6
delete sprite 7
delete sprite 8
delete sprite 500
delete sprite 104
delete sprite 1000
delete sprite 3000
delete sprite 3001
delete sprite 3002
delete sprite 3003
delete sprite 3004
delete sprite 4000
delete sprite 4001
delete sprite 10000

Set up a monster and some clouds and a small representation of the arena.

sx=0:sy=0
for t=1 to 140
sprite 65534,sx,sy-160,65534
sprite 65535,sx,sy,65535
inc sy,5
sync
next t


cy1=-10
cy2=-200
cy3=-300
cy4=-75
cy5=-250
cy6=-40
cy7=-150
cy8=-400
cy9=550

After setting the y positions (cy1= bla bla bla), you move all the remaining sprites DOWNWARDS.
This gives an impression that the player is moving UPWARDS.
Also move the small arena upwards so that its flying behind the clouds and move the monster downwards so it enters the screen at the top.


for t=1 to 180
sprite 600,10,cy1,2001
sprite 601,200,cy2,2001
sprite 602,300,cy3,2001
sprite 603,250,cy4,2001
sprite 604,100,cy5,2002
sprite 605,670,cy6,2002
sprite 606,660,cy7,2002
sprite 607,410,cy8,2002
sprite 499,40,cy9,499
inc cy1,5
inc cy2,5
inc cy3,5
inc cy4,5
inc cy5,5
inc cy6,5
inc cy7,5
inc cy8,5
if cy9>250 then dec cy9,4
sync
next t

This is the monster bit.
sy=-357
for t=1 to 70
sprite 608,330,sy,2000
inc sy,5
sync
next t

When you have just the monster and the representation of the arena on screen, you should do a big sound effect and then get the monster to blast the entire area with some super-dooper attack.
Unfortunately, due to budget cuts, and the no-proliferation treaty, the super-dooper attack is a couple of flashing orbs and a “beam” of white from its mouth!!. But Im sure YOU can do much better.

This is the monsters attack.
z=1998
do
for t=2004 to 2008
sprite 609,310,130,t
sprite 610,320,120,t
sprite 611,330,140,t
sprite 1999,0,145,z
inc z
sync
if z>1999 then z=1998
next t
loop
return


Ok, and that’s your lot you lot.

You could add a routine to make the screen go totally white and then fade back the arena with everyone there, and THEN use the blood animation to denote that the enemy is damaged by the attack. But as I always do, I will leave it to you to do it as you will only learn by doing and not just reading and watching.
Also remember that I have put no sound effects in this 3rd tutorial which means that you can add them yourselves and learn to key them to the action. It looks much better with the right sounds, trust me.

As for the standard attack, well, let me give you an example of what you could do for an attack animation.
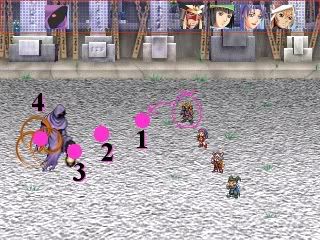
Get the character to jump quickly between points 1 to 3. Pause for a moment at 4. Animate the character doing an attack animation. Then put a sprite at position 4 and animate a flashing blade or another effect over the enemy.
Then get the character to jump from 3 to his start position and update the program.

I hope you have many hours (both good and frustrating) messing about with this tutorial, and please let me know if you use anything with in your first DBC/DBP programs, as its always nice to know that you’ve helped someone down the way.

Keep at it, and one day you will be able to produce your own creations and help other newcomers to this great language.

Cheers
Reaperman

Link for the files:
http://www.filefactory.com/get/f.php?f=411bff2f943e93f1a5ca4772
Tapewormz
21
Years of Service
User Offline
Joined: 15th Sep 2002
Location: Winnipeg, Mantoba, Canada
Posted: 17th Nov 2005 00:59
HOORAY!

*pats reaperman on the back*

Iceman
21
Years of Service
User Offline
Joined: 10th Jan 2003
Location:
Posted: 18th Nov 2005 16:54 Edited at: 18th Nov 2005 16:54
Hey Reaper......Just have to say this was worth the wait (but not so long next time eh?)

As Lord Dario said, this has to be one of the best tuts on the site, you make it seem so easy to do and your always ready to help n00bs.
In my book you get 10 out of 10.

Have a on me
Ken Ken
18
Years of Service
User Offline
Joined: 7th Dec 2005
Location:
Posted: 7th Dec 2005 19:36
Is it possible for someone to upload this for direct download? I keep getting redirected to a joke site whenever I try to download
Angel Eyes
19
Years of Service
User Offline
Joined: 16th May 2004
Location:
Posted: 1st Jan 2006 21:07
Ken Ken, Just click on the link under the RED text and it takes you to the download

Reaperman, just to say that this tutorial is great. Its just what noobs need to learn the roaps with.

Its so good that I think that it (and the others on this site too) should be bundled in to a zip by Rich and put on a special download link for the new members of this forum. Why they dont do something like that I dont know, because there are so many talented people on here that the TGC crew have some wonderfull program/Tutorials and snippets for their DarkBasic language.

But anyway -- I cant wait for the next tutorial from you. Maybe you could do a full program and do a tutorial on that? But if not, hurry up and do any tutorial because your helping a lot of people here.
DB problem
18
Years of Service
User Offline
Joined: 27th Dec 2005
Location:
Posted: 6th Jan 2006 00:31
Please someone can upload again this last file.

This link http://www.filefactory.com/get/f.php?f=411bff2f943e93f1a5ca4772 doesnt work

It has an error, in FileFactor saids:

Filename : mangalast.zip
Size : 1.182 MB
Warning: ftp_close() expects parameter 1 to be resource, boolean given in /var/www/html/includes/ff_files.class.php on line 409
Alert ! -- The file has failed verification, Please report so as corrective measures can be taken


Please someone upload again this file, please share!
DB problem
18
Years of Service
User Offline
Joined: 27th Dec 2005
Location:
Posted: 6th Jan 2006 05:47
Well now works that link, but it goes very slow, but at least I got the file

Thanks Reaperman Great job!
Wolf Dreamer
18
Years of Service
User Offline
Joined: 13th Sep 2005
Location: the land of chaotic dreams
Posted: 8th Jan 2006 19:17
I didn't read every post, but just to check, the .exe included in the listed download isn't fully functional is it?

If you choose attack, it says blindside, but nothing happens when you click on it, nor can you use any of the items. Summon dragon scrolls the view up, and the dragon thing attacks, but then it just keeps going. After 10 full seconds, it still isn't done attacking. Hitting Esc still works.

the last sane human being in a world gone mad
Reaperman
20
Years of Service
User Offline
Joined: 9th Sep 2003
Location: Kent, England
Posted: 9th Jan 2006 22:52 Edited at: 9th Jan 2006 22:54
Hello Wolf Dreamer,

Ok let me answer your post :

Quote: "“I didn't read every post, but just to check, the .exe included in the listed download isn't fully functional is it?”"


It works fully, but the program is not finished.

Quote: "“If you choose attack, it says blindside, but nothing happens when you click on it, nor can you use any of the items.”"


Correct. In all the tutorials I do, I never produce a fully functioning game. I have said many times that you learn better by having to do some of it yourself, so that’s why I don’t complete everything. However, I normally give enough info in the tutorial to help newcomers to DBP try their hand at changing/adding to the program. Also, if you really get stuck, you can post here and I will help you. But the idea is to give newcomers the direction and encouragement to do it themselves.

Quote: "“Summon dragon scrolls the view up, and the dragon thing attacks, but then it just keeps going. After 10 full seconds, it still isn't done attacking.”"


Yes, your right again. But I did say in the tutorial:
Quote: "“When you have just the monster and the representation of the arena on screen, you should do a big sound effect and then get the monster to blast the entire area with some super-dooper attack.
Unfortunately, due to budget cuts, and the no-proliferation treaty, the super-dooper attack is a couple of flashing orbs and a “beam” of white from its mouth!!. But Im sure YOU can do much better.
You could add a routine to make the screen go totally white and then fade back the arena with everyone there, and THEN use the blood animation to denote that the enemy is damaged by the attack. But as I always do, I will leave it to you to do it as you will only learn by doing and not just reading and watching.”"


So, have a go at trying my suggestion out, (or an idea of your own) and if you need help just post here and I will help you.


Cheers
Reaperman
doom on cats
20
Years of Service
User Offline
Joined: 31st Mar 2004
Location: stuck in a minnesota blizzard
Posted: 12th Feb 2006 03:11
i went and typed all of that code in and just when i was was done its says syntax error: nesting error at line whatever!
AAAAAAAAAAARRRRRRRRRRRRRRGGGGGGGGGGGGGHHHHHHHHHHHHHHHHHHHH what did i do wrong?!

"In peace sons bury thier fathers, in war fathers bury their sons" - Winston Churchill(i think). "don't piss down my back and tell me it's raining!"
Reaperman
20
Years of Service
User Offline
Joined: 9th Sep 2003
Location: Kent, England
Posted: 14th Feb 2006 03:15 Edited at: 14th Feb 2006 03:15
Quote: " i went and typed all of that code in and just when i was was done its says syntax error: nesting error at line whatever!
AAAAAAAAAAARRRRRRRRRRRRRRGGGGGGGGGGGGGHHHHHHHHHHHHHHHHHHHH what did i do wrong?!"


Well, you could just download the file , but because you have typed it in and you have a nesting error it sounds like you have missed off/added and extra "next" from a "for loop, or something like that.

Just go down your program line by line and compare it to the one above, and also make sure that if you have all the "endif"s, and "next"s in there.

If you still have a problem, just download the program...or post here with the line number and I will sort it out for you.

Cheers
Reaperman
x1b
19
Years of Service
User Offline
Joined: 19th Sep 2004
Location:
Posted: 16th Feb 2006 00:51 Edited at: 16th Feb 2006 00:53
Awsome work,Reaper! Though, the download link didnt give me all the source and media. just the most current.


Doom on Cats
Quote: ""In peace sons bury thier fathers, in war fathers bury their sons" - Winston Churchill(i think)""


it's quoted by Croesus of Lydia

- Do it, Do it Right, Do it right now..
Reaperman
20
Years of Service
User Offline
Joined: 9th Sep 2003
Location: Kent, England
Posted: 16th Feb 2006 01:08
Glad you liked it x1b

Quote: "the download link didnt give me all the source and media. just the most current."


I will sort that out and post another link to all the media.

Cheers
Reaperman
x1b
19
Years of Service
User Offline
Joined: 19th Sep 2004
Location:
Posted: 16th Feb 2006 01:22
Quote: "I will sort that out and post another link to all the media."


I recall following this thread religiousley in anticipation of its completion,long ago.

you sir,Rock.

- Do it, Do it Right, Do it right now..
Evil Booger
18
Years of Service
User Offline
Joined: 23rd Nov 2005
Location: My evil lair
Posted: 11th Apr 2006 23:49
nice

boogers will take over the world
ZDavis26
17
Years of Service
User Offline
Joined: 22nd May 2006
Location:
Posted: 27th May 2006 03:18
if someone has DBPRo and has already changed this code to fit in DBPro can you post your code here? I'm have just gotten DBPRO adn am a total noob and would like to learn from this
x1bwork
18
Years of Service
User Offline
Joined: 9th Nov 2005
Location:
Posted: 30th May 2006 21:06
Quote: "I will sort that out and post another link to all the media"


wheres the link =/

Reaperman
20
Years of Service
User Offline
Joined: 9th Sep 2003
Location: Kent, England
Posted: 2nd Jun 2006 17:57
Quote: "wheres the link =/"


I reposted the work at the original link x1bwork.

But to save confusion I will post a new link to it today.

Cheers
Reaperman

Login to post a reply

Server time is: 2024-04-20 01:46:54
Your offset time is: 2024-04-20 01:46:54